Mount an Ubuntu Web Server

We will see in this suite of tutorials how to mount a full web server under ubuntu 14.04.
This tutorial admits that you have some notions in linux. It will however be presented step by step to simplify things. Small recommendation. I suggest you buy a vps formula to dispense with the full installation of ubuntu.
First step connection ssh.
If you have installed ubuntu on your computer this step is not necessary unless you want to access it from the outside. At this time I advise you the installation of ssh (if not available in the ditribution) vi the following command:
apt-get install openssh-server
Access can be done via your root account otherwise you can fully configure your ssh via the following command
vi / etc / ssh / sshd_config
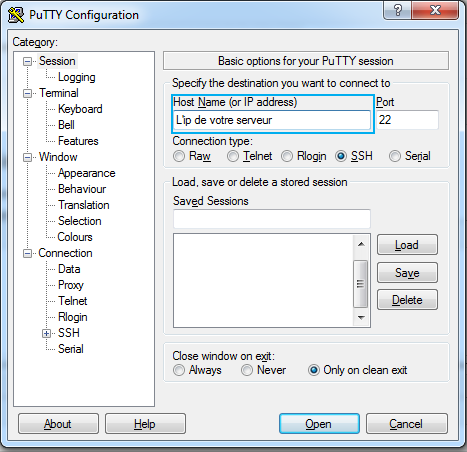
For windows users the connection ssh can be done via putty
For mac os x users, simply open a terminal and type
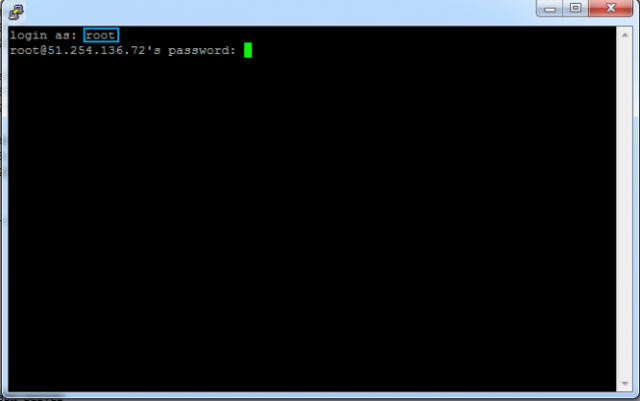
ssh root@l'ip _de_votre_serveur
Type as login "root" to have all the privileges or you can also connect via another user. Then type your password. Do not panic if you do not see the characters displayed it's normal. For Windows users if you copy a password via a text editor you can in this window simply make a right click (which will make you a "paste" operation
If you have logged in via an account other than root, you can type this command to get all the privileges:
sudo su
Once connected, it is essential to update the list of packages via the command
apt-get update
Then update your machine via the command
apt-get upgrade
Qwerty keyboard
If your keyboard is in qwerty type this command:
dpkg-reconfigure keyboard-configuration
Follow the steps by choosing "French keyboard" when this option is presented to you
Apache + mysql + php installation
You can now start the installation of your web server. Here we will install apache + mysql + php
The installation command:
apt-get install apache2 php5 mysql-server apache2-utils php5-mysql
You will be asked which server to use "apache", "lighttpd". At this stage, go through the directional arrows of your keyboard on apache then press the space bar to select "apache" and validate with the touch enter of your keyboard.
You will be asked for a password for mysql, we strongly advise you to use a secure password.
Installing phpmyadmin
For the installation of phpmyadmin you just have to type these two commands. The first to install phpmyadmin and the second to restart apache so that it is price in account
apt-get install phpmyadminservice apache2 restart
phpmyadmin is accessible via the url: http: // localhost / phpmyadmin or http: // your_ip / phpmyadmin
Once phpmyadmin is installed you have to configure a user with rights on a table. to do this you must connect to the command line mysql (with the password previously chosen)
mysql -u root -p
Once connected create your table:
create database my_table;
Then create a user who will have access to it:
create user 'un_identifiant' @ localhost identified by 'un_mot_de_passe';
And give him all the rights
grant all on my_table. * to 'an_identifier';
You can now login to phpmyadmin with this login
Activation of the url rewritting
In order to be able to browse your website via the links of your pages, you must activate the rewrite of url (unless your site is only static files)
a2enmod rewrite
Installing Curl
(optional) Curl allows you to make queries outside your website and is especially used for the use of APIs
Curl is already installed on your server. It is simply missing the php extension to use it via your php code.
apt-get install php5-curl
Installing Memcached
(optional) Memcached makes it possible to store information in ram and to serve it very quickly. This tool is particularly useful to alleviate mysql requests and especially update / insert (counting visitors for example).
apt-get install php5-memcached memcached


Post a Comment